In our first article of our Solar 101 series, (“Is my roof ready for solar?“) we discussed the age of our roof and how it affects the finances involved in a solar installation.
Now, we’ll consider the roof’s physical characteristics. After all, the roofing material type and its underlying structure, as well the various angles of its faces and layout, will affect many aspects of the installation.
Attaching the solar panels
Most rooftops in the United States are built up from plywood and finished with asphalt shingles. However, depending on your region and neighborhood aesthetic, the top layer of the roofing type can vary greatly. We often find Spanish tiles in the south, metal seam roofs in the far north, and clay, slate, and concrete tile products peppered all over the map.
All of these roof types will require a mechanical attachment.
QuickMountPV offers up an installation guide – with a very nice series of images – for those installing solar power on top of tiled roofs.
In this installation tweet from Sunrun, you can see how to attach to the plywood base layer of a roof. Underneath the metal flashing, you can see a series of lag bolts and silicon that cures and seals the attachment.
A metal seam roof will also require a hard attachment to the roof, but via a less obtrusive tool, perhaps by someone like S-5!. This quick video by S-5! gives an idea of how that attachment occurs.
But most installations won’t be like these three examples. They will use standard flashing and lag bolts drilled through the existing asphalt shingles.
All major racking manufacturers provide this hardware. Quickbolt offers a unique – almost cute – “microflashing” unit. This is as simple as it gets: drill hole, install sealant, tighten fastener.
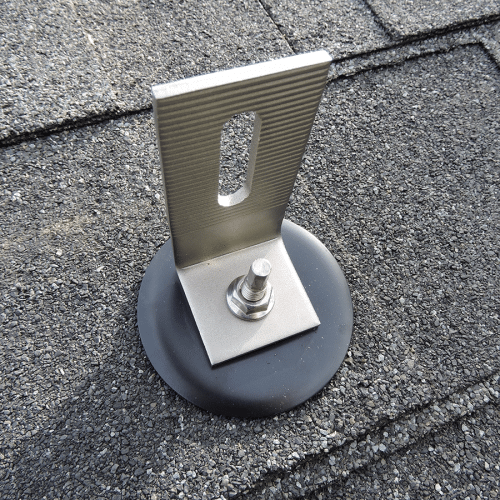
Racking hardware connects your panels to the L-feet and the flashing connections mentioned above. All of this hardware is built to engineering specifications and are ready to hold up to the worst that Mother Nature can deliver.
Building codes and setbacks
In South Florida, the local building code requires some rooftop solar systems within a mile of the ocean to be able to withstand uplift generated by winds greater than 180 miles per hour. In the northern United States, snow loads greater than 50 pounds per square foot must be accounted for.
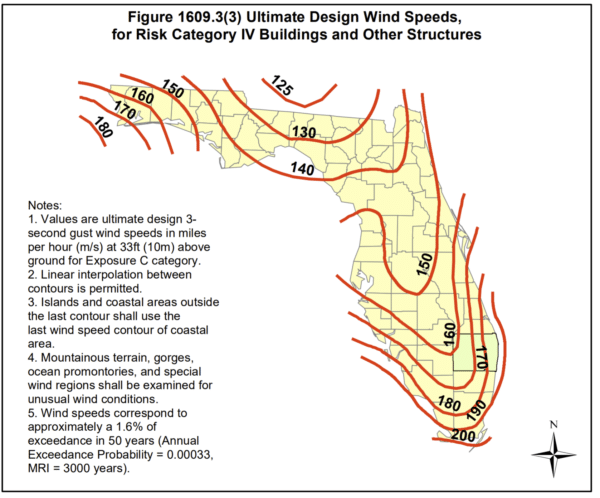
Wind and snow loads dictate a lot about how your solar system is designed. Racking manufacturer Unirac includes general solar panel setback from the edge of roof requirements in its installation manuals.
In the images below, the areas where wind forces are highest are represented in gray. Thus, engineers suggest we ‘”set back” our solar panels from these areas, or pay extra for hardware to strengthen the attachment points.
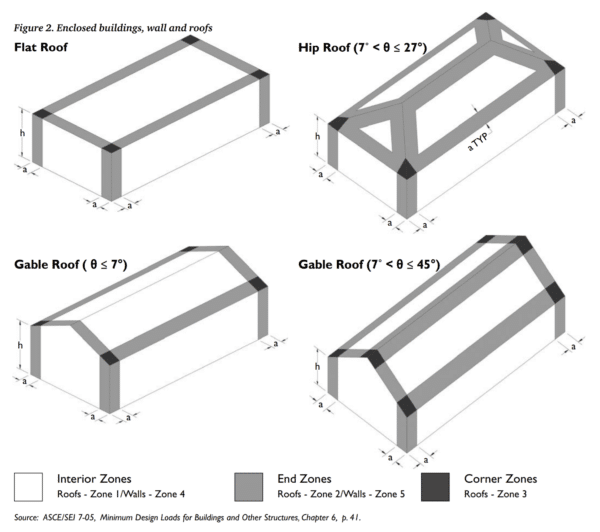
Image: Unirac
The strength of a solar racking system is determined in part by the metal racking, but it also depends on the roof’s underlying structure. Specifically, rafters (or trusses) and any supporting structures must be strong enough to withstand your region’s maximum wind loads.
The lag bolts noted above are generally drilled into the wood beams underneath the base layer of your roof’s plywood. As a rule of thumb, in most homes we’re looking for a minimum of two-inch-thick wood beams spaced no more than 36 inches apart.
Your installer will most likely consult with a state-certified structural engineer to determine if your home’s construction is appropriate for solar. While most homes are deemed structurally sound, proving that to some building departments can sometimes be a bit costly.
Wanted: Big chunks of roof
Now that we’ve covered the basics of connecting solar panels to a roof, it’s time to find a place for the panels. The most obvious feature we’re looking for is large, uninterrupted roof space. Bigger chunks of roof are easier, and cheaper, to install solar panels.
Keep in mind that a standard residential solar panel is roughly five and a half feet tall by three feet wide. Pictured below, this 290 to 320 watt solar panel from URE represents a standard residential product. Panel sizes vary by manufacturer and model. For instance, Solaria’s 400 watt PowerXT high efficiency panel is an extra six inches wider.
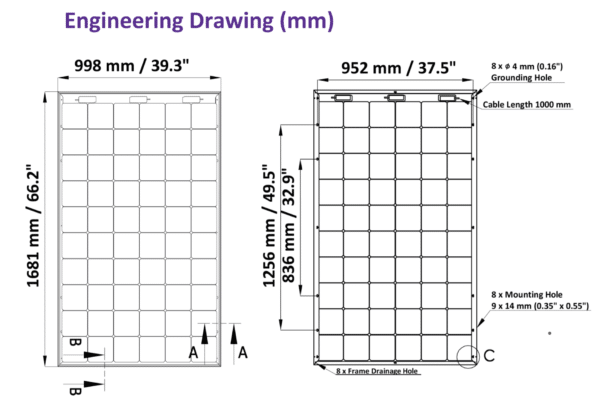
Image: URE
Using these approximate sizes of the panels and our roof, we can determine roughly how many panels will fit on our roof, and where.
In our next article, we discuss how a home’s latitude affects a solar project’s design and performance. We will also offer examples of how to calculate the electricity generated by a system.
This content is protected by copyright and may not be reused. If you want to cooperate with us and would like to reuse some of our content, please contact: editors@pv-magazine.com.


This is a good subject to discuss.
I wonder about capacity of the general racking configurations for snow loads. This is due to only a few rafters carrying the loads transmitted from the panels and racking. Without panels, the snow load is distributed uniformly across the entire structure. My 9 kW system has middle supports about every third rafter. I’m in middle Atlantic coast area so snow is not that common but we do occasionally get a zinger. My one regret about the structure is not installing struts tying rafters bearing racking loads to load bearing walls below. This is something I am considering adding.
It would be interesting to see someone come up with a configuration which replaces the roof structure with aluminum rafters and rimless, flush mounted panels mounted like the sort of stuff you see in a glass roof. Such an installation would have cooler panels, rodent protected backsides and easier electrical inspection, maintenance. As best as I can determine, this is not done due to code compliance/certification or electrical bonding issues. It seems like a leak nightmare but glass roofs are out there and some consider them very attractive.
First, not a structural engineer, so please take everything with a grain of salt!
I do know that when we deploy solar panels that 100% cover a commercial rooftop, the loads do get transferred better versus when a solar system only partially covers a roof. Recently had a project whose structural viability increased when it did in fact cover the whole roof. That was surprising to me.
You’re right about the distribution of snow loads on rafters/trusses/etc. I kinda didn’t touch on that section a lot as I didn’t want to say things wrong. There’s a lot of chatter that always occurs about rafter spacing, thickness of rafters, panel width, etc.
We should get a structural engineer to write an article on this…hrmmmm